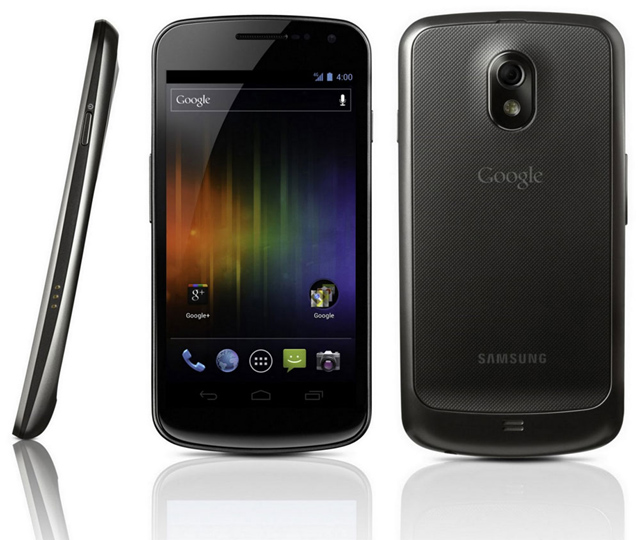
Ok, you’ve been patient, you’ve complained and you’ve pleaded but still you can’t get regular updates on your carrier branded Galaxy Nexus. Well, is it time to think about unlocking and putting on the international firmware to ensure that your phone gets updates?
Before we start, a minority of people will tell you the carrier branded phones are different hardware wise to the International unbranded Galaxy Nexus. To put it simply: They. Are. Wrong.
EDIT : This Guide is intended for Australian Carrier branded Galaxy Nexus phones, if you have a Verizon branded phone. DO NOT PROCEED any further.
Now there’s two ways to do this, the easy way and the hard way. The easy way will get the job done but the hard way you may actually learn a little about your phone and how to ‘hack’ it a little.
Please Note : While this is a pretty easy process, we don’t take any responsibility for you trashing your phone. We didn’t create these instructions or the software used. By proceeding, you take all responsibility for what you do with your property. If you have issues, we suggest checking the XDA-Developers forums for ideas on recovering from a particular issue. That said, you shouldn’t destroy your phone by doing this. It’s pretty safe.
Update: As of the 25th of July, the Android 4.3 Factory Image is now available and can be substituted in ‘The Hard Way’ section.
IMPORTANT : Unlocking your Bootloader WILL WIPE YOUR PHONE, this means EVERYTHING, SMSs, Pictures, Music, EVERYTHING. If you are not at all comfortable in doing this DO NOT PROCEED.
The Easy Way
Galaxy Nexus Toolkit
A team over at XDA regularly puts out toolkits for Nexus devices, these toolkits include the ability to unlock/lock your bootloader, install custom recovery, root your phone and most importantly install install the factory images from Google onto your phone.
First step is to go to the XDA Forum thread for the Galaxy Nexus Toolkit. Download the toolkit and install it, we also recommend if you find this helpful to make a donation, this means you can actually download updates through the toolkit rather than downloading and re-installing the updates everytime it’s updated.
Once you’ve installed, run the toolkit.
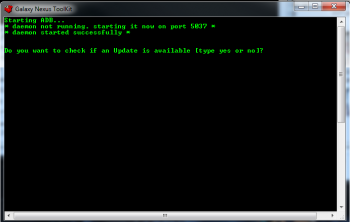
Step 1 : If you donated you can check for updates and type ‘Yes’, if not type ‘No’.
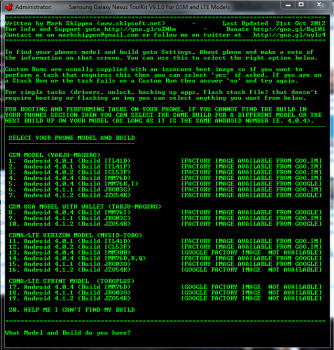
Step 2: Doesn’t really matter what you have here as the carrier firmware is not listed. Simply choose anything from 1-19 and hit enter.
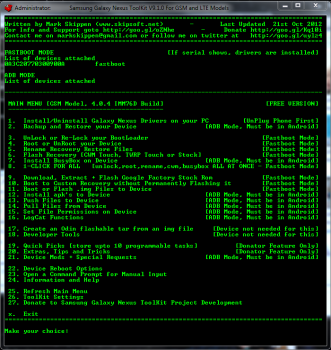
Step 3: You’ll need to install drivers to your PC, Make sure your phone is unplugged and choose ‘1’.
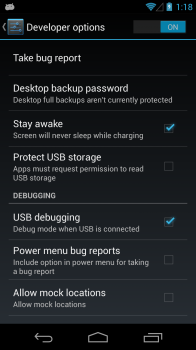
Step 4: Turn on USB Debugging, On your phone, go to Settings > Developer Options and tick the box next to ‘USB debugging’.
Step 5: Once you’ve plugged in your phone, select option ‘3’. It’s at this stage you’re about to unlock your bootloader.
It’s at this step everything on your phone will be wiped including internal storage: Pictures, Music, SMS Messages, EVERYTHING. Backup your phone first or stop if this bothers you too much.
Step 6: From this screen you’ll select Option ‘1. UnLock Bootloader.
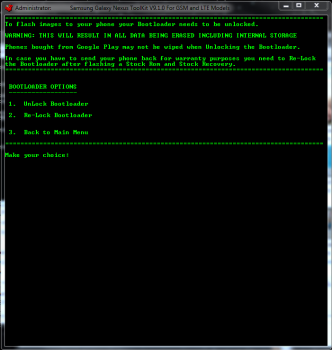
Step 7: You’ll then be asked if your phone is in Fastboot Mode and you are ready to continue. If your phone is just in Android type No and your phone will reboot and your phone will reboot and come to this :
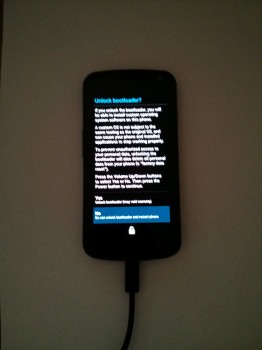
The next step will unlock your bootloader and delete everything on your phone. Proceed with caution!
Once you’re at that screen use the volume up/down buttons to highlight ‘Yes’ and then hit the power button to select. This will delete your data and unlock your bootloader. You will then be returned to the Fastboot screen :
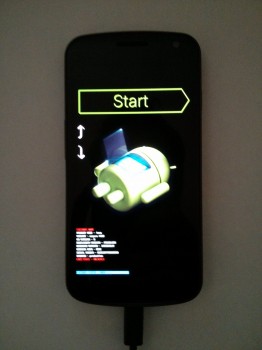
Step 8: Your Bootloader is unlocked and the Galaxy Nexus Toolkit will take you back to the Main Menu.
Now a Note:
At time of writing the Galaxy Nexus Toolkit is only setup to download the Android 4.1.2 (Build JZO54K), but this is OK, because the OTA is rolling out and as soon as it’s flashed when your phone boots into Android, you should be prompted to download the OTA and then it will just update.
Step 9: Download the Factory Image, Select option ‘9’ from the Main Menu, then select option ‘1. Download Google Stock Image’
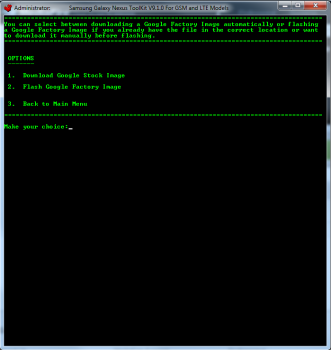
Step 10: Select ‘7. Android 4.1.2 (Build JZO54K)’. Note: This takes a while, factory images are 300MB+ to download.
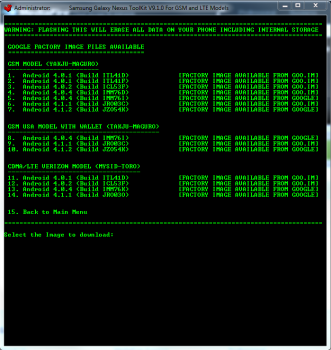
Step 11: Once it completes you’ll be asked if you wish to flash the image now. Select ‘Yes’
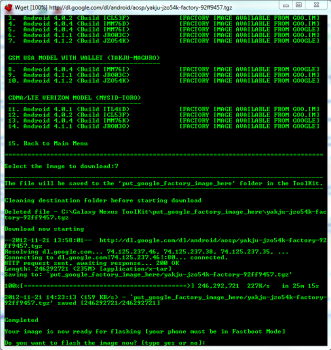
Step 12: You will now be asked if your phone is in Fastboot mode.
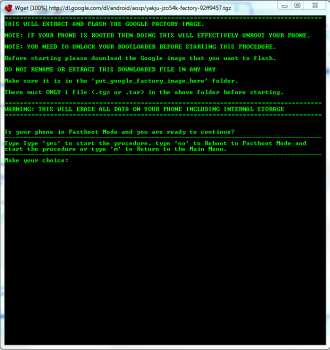
If you have done everything so far your phone screen should have this on it:

If it does, type ‘Yes’
If you are back in Android, type ‘No’ Your phone will then reboot and continue.
Note: This takes a couple of minutes to do. DO NOT DISCONNECT YOUR PHONE AT THIS TIME
Step 13: Once Completed, your phone will boot into Android. The Galaxy Nexus Toolkit will now go back to the Main Menu.
Congratulations, that wasn’t so hard was it?
Notes: You have just flashed Android 4.1.2 to your device, it is the Yakju build so if you need any OTA files you just have to get the Yakju file. The Yakju OTA is rolling out now, so you should receive a prompt to download and install it pretty quickly once you’ve flashed your phone.
The Hard Way
Ok, You decided to go the ‘Hard Way’, Kudos. The advantage of this way is you will install the Android 4.2 image straight to your phone, no messing around with 4.1.2 and waiting for OTA as in the Easy Way.
First step: Install the pre-requisites
- You must have the Android SDK installed and be able to access and use adb and fastboot.
- You must have USB debugging enabled on your Galaxy Nexus. On your phone, go to Settings > { } Developer Options and tick the box next to ‘USB debugging’
Second Step: Download the Factory Image from Google
- Go to the Google Developers Factory Images page.
- Underneath the heading Factory Images “yakju” for Galaxy Nexus “maguro” (GSM/HSPA+), Click the link for Android 4.2 (JOP40C)

- This will take you to the actual link, click on the link and you will be prompted to download the file ‘yakju-jop40c-factory-267d243c.tgz’. Save this file to somewhere on your hard drive you can find again.

- Once downloaded extract the tgz file to a directory using a compression tool such as WinRAR
- Copy all the files contained in the folder to the same folder as Fastboot resides in when you installed the Android SDK, this should be something like : ‘C:\program files (x86)\android\android-sdk\platform-tools’
Third Step: Unlock that bootloader
Note: This will wipe whatever is on your phone, ensure you’ve backed up everything as this wipes all Internal storage : Music, Pictures, SMS Messages: EVERYTHING! You Have Been Warned.
- Connect your Galaxy Nexus to your PC/Mac via the USB cable that came with it.
- Launch Terminal (Mac) or Command Prompt (Windows)
- Navigate to the fastboot/adb folder which will be inside the location where the Android SDK is installed (On Windows, it should be in C:\program files (x86)\android\android-sdk\platform-tools). On Mac, it’ll be in whatever folder you’ve unzipped the SDK to, and in that same platform-tools folder.
- Enter the following command:
fastboot devices
You should see your device ID. If you don’t, you don’t have the proper driver installed and should make sure you have the USB driver installed from the SDK download, if you have issues with drivers don’t worry you’re not the first, I actually had to install PDANet to get the correct drivers installed.
Note: Mac users probably won’t have this issue – no driver is required.
- Enter the following command:
fastboot oem unlock
From here, on your phone you’ll be prompted to select Yes or No as to whether you want to unlock your bootloader.

On your phone, use the volume up/down buttons to highlight ‘Yes’ and then hit the power button to select. This will unlock your bootloader. You will then be returned to the Fastboot screen :

If you didn’t get a device ID from step 4 and you moved to this step by mistake, it will be stuck on “Waiting for Device”. Make sure you have the USB drivers installed, Windows users.
- It should say Start in the top right. Hit the power button to reboot.
If you decide for whatever reason to re-lock the bootloader (e.g. you might want to return the phone to factory stock and sell it to a friend), simply substitute
fastboot oem lock
Fourth Step: Flash that 4.2 Build
- You should still be in the bootloader screen, if not, turn off your Galaxy Nexus. Then hold down the Volume Up+Volume Down+Power button all at the same time and you should be now be in fastboot mode on your phone :

- In your command prompt/terminal window you should be in the directory containing the fastboot.exe file and the extracted files from the ‘yakju-jop40c-factory-267d243c.tgz’ file you downloaded previously.
- At the prompt type in
flash-all.bat
Fifth Step: Options
Either lock your bootloader as per above or enjoy your carrier unbranded Galaxy Nexus
I have tried to be as comprehensive as possible with these instructions and I did every step with my own Galaxy Nexus but it is originally an internationally unbranded Galaxy Nexus, if you run into any difficulties, trawl through the XDA Forums as there are many people there who have most likely run into the exact same issue you have already.


